Wednesday, August 31, 2011

Maylea = FO!!

I've got my Maylea done finally!

I've done three of these things and the reason I've only done three, is because I don't want to do four.

Don't get me wrong. I love it! It's beautiful! But a girl can only take so many times doing the same thing. For me at least. (except for hexipuffs of course...there are exceptions to that rule)

So this was my last one. This time, while I was grafting, I took some pictures for those of you who are using the grafting option.

This is what it looked like during grafting...well, almost done with grafting.


A tip for grafting: Rearrange the first three and the last three stitches on both sides to where the middle stitch becomes the first stitch and last stitch respectively, and then do a knit kitchener on those stitches. 

Clear as mud?

Which is what Im about to do here.....


Here it is done with grafting, and at the adjusting stage. 


And after adjusting, ready to sew in the ends and be blocked.


Im very happy with the results! Im still amazed that I actually designed such beautifulness....here's some morning after pics.

Which of the next 2 pics do yall like for the pattern page?


Heres the graft in the daylight. 


But seriously folks. Its not a hard scarf. In fact, you should hop right on over to Ralvery, and get you the pattern. Then post pics in your project pages when your done with it! Or, if your not on Ravelry, you can get it here on this site!! cool huh?

 Its just after three of them, I'm done.

One WIP turned into a FO. NEXT! (this also gives me more time for hexipuffing!!! YAY!)

TTFN

Sunday, August 28, 2011

I don't have grapes down yet....

3 years ago, we planted some grapes. A row of 7 concords and a row of 7 ummm ....green ones...LOL

After all the studying we did (and are still doing) on grapes, we decided to put them in a "Four Arm Kniffin System"

So you set all this up and then plant your grapes and then keep them pruned until they get trained in the position you want. So we did that, and this year, some of them were in that position, so I let them fruit.

Not knowing when to harvest them, I waited till they turned colors and then waited some more cuz what I read said just because they turned, don't mean they are ready.

Being a farmer, I know that the animals know exactly when to "harvest" so I was trying to take my que(cue?) from the birds.

They have been around my grapes a lot lately, so I went out to taste one and decided it was time to harvest them.

This is all I got out of 4 plants that I allowed to fruit.


I assume that's a bad harvest. I also assume that's not enough to do anything with. So I'm just gonna put them in the fridge and let the boys devour them. 

But HEY!! I got grapes! FROM MY VINES!! I'm sooo totally stoked and at the same time depressed. You should see my vines! they are a mess....I think

This plant is a bad example, I was just learning here and cut off the bottom two "arms"

Please dont look at the ground level...I need to mow and trim, and speaking of that, is there a way I can stop all that nonsense too?? I know they don't like grass and crap around them...so I want to put something around them that will keep it dead and I can still mow. 

They don't look like the pictures I've seen but everything I've read, says to not prune till fall. And then you only prune certain canes!! Look at them! they are totally all. over. the. place!! SURLY this isn't right. 

AAAAAAHHHHHHHHHHH!!! 

I'll get it. eventually. Both me and the grapes are still in training.   

I want grapes from my own vines too much, not to mention how much money, time and effort we put in to these things. See those posts?  There are 16 of them, all hand dug 3 feet underground. Yea, that was a day!

But the long and short of it is....I got some grapes this year. Maybe not more than enough to last thro an episode of Top Gear....but I got grapes!! And next year will be better.....I hope. 

If anyone wants to give me some pointers on these things...I would love you forever!! I think I got a good thing going....It just needs tweaked quite a bit.   

Friday, August 26, 2011

Color Challenged

I've been buying and trading yarn a lot lately for my hexis, and so I thought I would lay it all out again and see  what direction I need to go with if I trade again.


I have a crapload of variegated yarn and not very much solid. and not very happy colors in the solid. in fact…it all has a very “dark” feel to it. well most of it…I took a pic..albeit crappy…


I guess Im just thinking about it too much. This is supposed to be a random color quilt! But I cant help feel not happy with these color combos.  Tell me what yall think? Really, I need to hear opinions. 

If anyone wants to trade something with me that would be great!!! I'll take close up shots of anything you want.

And then Mary gave me a suggestion to put my yarn in a colorwheel...


Here's my bad attempt...still not sure. but it makes it easier to visualize. I wonder if I should just throw in the towel and just knit the stuff...LOL 


Heres an updated shot of my basket tho!! Im up to 19 hexis! And if you haven't yet, hop over to my post on Yummy Yarn Giveaway and enter to win some yarn!!! 


These are my faves so far!! I just LOVE those colors!! they arent as pretty here in the picture as they are in person tho!! 


How yall doin? Whats your hexi count? 


Thursday, August 25, 2011

It just doesn't matter

It really doesn't....It doesn't matter how you get there, just get there, and don't sweat the small stuff.

I just posted the first video in a series of cast on videos and this one was on "Judy's Magic Cast On"

Do you know, when I researched this technique, I watched many videos, and there were tons of variations on how to get the same final seamless cast on??

But there were similarities...Ive tried to break it down and make it simple for yall.


Check out the video. Let me know what you think.


Ok, whats next???


Tuesday, August 23, 2011

Taming the Porcupine

Or if you prefer...Working with Double Pointed Needles.

When a knitter first starts out with DPN's, some frustration, fear, and possibly some pain comes along with it.

I'm not gonna lie to you and tell you its all wine and roses and it's not gonna be that way....Its inevitable. Sorry. It won't be that way for long if you keep at it, but its the start up that you have to endure. But the pay off is sooooo worth it!

But If I can help relieve some of that "start up", I'm gonna. Which is why I made 2 videos on the subject.

The main thing is, to make things comfortable for yourself. If a needle feels better laying in this direction or the other, move it! The knitting police wont come get you if your dpn's aren't laying in a certain direction. And don't let the project scare you either.

YOU ARE THE BOSS OF YOUR KNITTING!!!

YOU WILL OWN THESE BLASTED POINTY STICKS!!!!!!

Knitting is supposed to be fun! Not a royal PAIN IN THE RUMP!!! (or in this case, hands, wrists, and fingers and possibly the chap who was in the way when you threw the whole mess!)

The problem I had with making the videos tho, is what to say to help! So these may be worthless as tits on a boar hog, but I tried.

So grab your needles, yarn, chocolate, glass of wine(or vice of choice) sit down and watch these videos, and maybe work along with me,(there is a pretty handy pause button) and let me know if they helped or not.

If they did? Please tell me that so I will feel better about things.
If they didn't? Please tell me that too, so I know how to improve.

Working with 4 DPN's


Working with 3 DPN's


Stay tuned for my series of videos on "Cast Ons" and if you have one in particular you would like to see demonstrated, please let me know.


Sunday, August 21, 2011

The Kitchener Stitch

These words strike fear in many a knitter.

But its not really skeery...Its really a very useful and very awesome technique to have in your tool belt!!

say this to yourself as your doing it...
front~knit off~purl on through
back~purl off~knit on through

I made a video about how I do the kitchener to add to the billion other videos out there about the kitchener stitch.

Check it out and when your done watching, comment with how you liked/disliked the video. Please be very candid because Im trying to improve my video skillz...


Anyone know why I have a black box around my video??

I want to add to the video, there is a better way of dealing with the ear than just hiding it like I did in the video. 

Thank you to Treetracker, who led me to a discussion on this very subject! 

What you do is, take the beginning stitch, and pull it up and over the next one. Repeat for the back needle and your down by 2 stitches.
Now just do your kitchener like I showed you all the way up to the last two stitches, and take the last stitch and pull it up and over the 2nd to last stitch, repeat for the back needle and your down by 2 more stitches. 
Finish your kitchener, and you dont have an ear anymore....YAY!! 

If need be, I will redo the video to include this. I may redo it anyway, some folks have said, my hands are too far away from the camera. 


And if anyone is interested in other techniques....please let me know!! I got a new video camera, I wanna play!! 

TTFN

Tuesday, August 16, 2011

YUMMY YARN GIVEAWAY!!!


So who wants some free yarn??? 
Check this story out and then the details are after it. 

Proof that engineers cant help themselves.
I casually mentioned to my husband that I needed to figure out where I was gonna put my hexipuffs when I couldnt get anymore into the basket im using to store them now. Between my son and my husband(the engineer), they were fighting over how many hexipuffs would fit into said basket.
My 8yo son shouted out a number and my husband, quietly went and got a piece of paper, pencil and a tape measure and commenced to measuring stuff and writing a whole bunch of numbers down……MATH….(eww)
Now, each of them have a piece of paper at the bottom of my basket with an estimate of how many hexipuffs will fit in the basket.
observe………


I told this story on the Beekeepers Quilt KAL thread and they gave me an idea!! 

I'll make this a game and give away some yarn!! Free yarn always makes folks come runnin. It would me! 

Especially this.....


This is Zia. 
110yds/4oz of 100% Egyptian Cotton 
Color: Safari Z125

How do you get your hands on one of these?? 

Just leave me a comment with the amount of hexipuffs you think will go into the basket up to the wood traveling all around the inside at the top. 

Please make sure you leave me your email addy so I can get a hold of you. And if you have a blog, PLEASE leave me a link so I may visit my neighbors!! And I would be honored if you add me to your lists of blogs to read.

The folks on Ralvery that responded to my post on this, already have your names with your guesses, in the basket. 

It would be awesome if you followed me too! I do have a couple of useful words occasionally. 

When I make enough hexipuffs to fill that basket up, Ill count them and.......

The one that hits it right on the money or the closest to the amount, will get 2 of these skeins. 
The three runners up, will get one of these skeins. 

Pretty cool huh? 

Now, please remember, its gonna take a while for me to get this basket filled up. But when I do...the yarn will be sent out!! 


You can see how many I have done by watching that counter over there on the right side of the blog. And be sure to get your hexipuff gear!! 

Good Luck!!!! 


Monday, August 15, 2011

Canning Banana Peppers

Im canning my banana peppers today.

I hadn't canned banana peppers before this year. So I was a little nervous as to if these things would actually get ate! Who wants to go through all the work and then let them go bad because no one wants them in the first place. 

So I made my family pinky swear that they would eat them if I bought the plants, grew, tended, harvested and canned banana peppers. 

Earlier this year, I canned one jar of them and they are already gone. So, I guess the pinky swear thing works!! (must file that method away for future use!!) 

That one can was a test of not only if my family would eat them, but if the recipe I used, kept the peppers crisp and tasty! Apparently since they didn't last long, I have found my recipe!

When asking the boys what they thought of the peppers: "They are very good!"  
Me: "Are they crispy?" 
The boys:  "Yes"

I would have like them to elaborate a little more, but I guess that's all I needed. 


This method uses open kettle method, which I'm ok with, and I think thats what led to my success with these peppers. If you boil them, even for a few mins they get mushy. We don't like mushy peppers. So we stick to the open kettle method. 

First, you have to have banana peppers of course.....


As you can see, there ain't very many there. But in pepper ring world, there is. You will need an average of 8 cut up peppers per pint jar.

Once you get them all washed, you can choose to leave them whole or cut them in rings of the width you want. 

Im doing both. 
Somehow, I got some small ones. Must have been cuz my son took it literally when I told him "Go and get all the banana peppers you can find off the plant." Which brought on the whole "You only pick whats ready to be picked" conversation when we saw his findings. 

So here's all the banana peppers my son could find, already cut up, including some small ones I've left whole and I'm gonna just stick them in there with the rings. I hate to waste stuff. We will see how this turns out. 
  

Enter another option here...you can choose to take out the seeds which, I'm told, will make the peppers very mild. Or you can choose to leave them in. 

Again, Im doing both.

Because Im lazy, I just wash, cut and rinse them and what doesn't fall out from all that moving around and rinsing, goes in the jar. It seemed to have worked well for the first jar. So I'm stickin with this method.  

Now you need to get a 1 to 1 vinegar/water mixture to boiling. You can pretty much plan on using 1cup of vinegar and 1cup of water per pint jar, with a very small amount of left over.

You also need to get a tall pot of water boiling and put your washed jars, flats, and rings in and keep them boiling till you are ready to put the peppers in. Its fairly important that everything is pretty hot when this all goes down. 

Gather all this stuff........


~Canning and pickling salt
~Alum
~1 clove of garlic per jar
~1/2 teaspoon measuring spoon.(how do you say that??) 
~funnel
~ladle 
~butter knife
~jar grabber(not pictured) 

And...it would be handy if you had a magnetic something or another to get the flats out of the boiling water. 

My jars, flats and rings are boiling and my vinegar/water mixture is boiling. 

Make sure you have all of the above stuff handy because all this next bit has do be done quickly:
~Take your jar grabber and grab you a jar and put a clove of garlic at the bottom and start cramming these rings in till you get to 1/2 inch headspace. Yes, I said cram. Don't be all gentle with them. Just start shoving! (I get a bunch of rings in and put some mixture in and that softens them up enough that they will cram easier and shove some more in there.) 
~Add 1/2tsp of alum
~Add 1/2tsp of salt
~fill jar with vinegar/water mixture till you get to 1/2 inch headspace 
~take butter knife and get the air bubbles out 
~wipe down the top of the jar, put a flat and ring on and set aside. 

When everything in the jar has cooled down, it will seal itself and your golden. Don't expect this to happen right away...but it will happen. 

I would wait at least a couple weeks before eating them so all the flavors can melt together. But I have heard of folks eating them the next day....up to you. 


Now your ready for some serious sandwich action.......AND/OR you could do what my boys are doing...when I serve supper or any meal, they grab some and put them on their plates and just eat them that way. 

How do you eat banana peppers? 

They do look good! If you try this, please let me know how it worked for you!! 

TTFN

Update: These things are amazing!! Very good, just the right "hotness", and crispy!!! I'd say, these could give subway a run for their money!


Sunday, August 14, 2011

Is there a difference?

I got some yarn in the mail yesterday that im going to use for my Beekeeper Quilt, and it inspired me to drag out all the fingering im planning on using for my quilt, lay it out and look at all the colors together.


What do yall think?
I think it will make a very cool beekeepers quilt! Somehow, in a weird sort of way, all the unmatched colors together, match. I envy some of the quilts going tho! There are some very gorgeous ones that have matching colors!! But I think mine will turn out just fine! 

And BTW: If you are doing this quilt, and want to swap any of the above yarn with me, let me know!! I also have some close up pics of the 10 skeins of Koiguo in my stash on Ravlery.  

I also have been fine tuning the pattern for the hexipuffs. Yanno, a way that I feel all nice and comfy with, that still is easy and portable. 

Heres a couple things Ive been doing with them. 

First, I haven't like the fact that the cast on doesn't match the bind off. I had decided from the very first time I read the pattern that I was gonna do a kitchener bind off. no question. Its just easier for me, and I actually like doing the kitchener. Not to mention the results secretly make feel like im a superpower. So kitchener it was. 

Now, about that dang cast on....... 

WAY too fiddly for me. If you do your toe up socks the suggested cast on way, your golden. But I don't. Never have liked the looks or the execution of that technique. 

So I present to you, a comparison of two cast ons that will match the kitchener bind off. Click on any pic to embiggin

One of these pictures shows the results of a tubular cast on for a 1x1 rib, and one of these shows Judy's Magic Cast On. 


Can you tell the difference? Is there one? 

No. Not in the looks of it. Not in my opinion. Both cast ons look like a row of knitting and therefore are invisible, and therefore match the kitchener bind off. 

So it comes down to which technique is easier for you to pull off. And for me, which one is quicker?

Just for the record, the one on the left is Judy's cast on, and the one on the right is the tubular cast on.  

To accomplish the tubular cast on for 1x1 rib and incorporate it into the hexis:

1. Cast on all stitches onto one needle.
2. slip wyif, knit wyib, repeat to end. turn.  
3.  repeat #2. 
(steps two and three will give you the first knit row as instructed in the pattern.)
4. Using 2 free dpn's, put purls on back needle and knits on front needle.
5. Begin pattern at first increase row.

Pros:
~you can get some distance between the first increase row and the cast on. This will make things easier to work the increases. 
~ Cast on and first knit row is done on one needle. 
Cons:
~with every slip, you are stretching those stitches out. which causes a loose cast on. 


Too loose of a cast on for this one. 


To accomplish Judy's cast on:

1. cast on all stitches onto 2 needles. Half the required cast on amount onto each needle. 
2. begin pattern at "knit one row". 

Pros:
~Cast on and stitch separation as instructed in pattern are combined in this cast on. 
~This method can produce a tighter cast on than the tubular cast on. 
Cons:
~Its easy to do this cast on extremely tight. You have to watch yourself. If too tight, this cast on will become fiddly and unworkable, then we are back at square one.
~the top needle stitches are cast on twisted so you have to remember to knit them thro the back loop.   
~When doing the kitchener bind off, you need to leave it a little loose to match the cast on. 


If you leave the kitchener a little loose, this matches perfectly! 

So, there you have it in a nutshell....my cast on will be Judy's. It shortens your steps so you can finish your hexi quicker and get to squishing it. And, for this application, its a better cast on, in this knitters opinion. 

Ive also been perplexed by this left leaning decrease....

Ive done the k2togtbl, the plain ole SSK and neither of them looked good to me.


Folks, forget every other left leaning decrease for this small, squishy thing. This is the one you want. 


Its easy. It looks just like the k2tog. nuff said. done. 

So now all I need, is to figure out what to do to avoid that ear at the end of a kitchener. Any advise? 
Thank you to treetracker who directed me to some answers!! I'll explain them in my Kitchener post


So up to now, Ive been toying with different methods of doing these hexipuffs to keep them portable and fun. Yes, I way over think things. But I am anal like that. I hope Ive helped someone by writing all this down! 


So yea, all of these, are tests, but you can bet your sweet potatoes that you will find them in my Beekeepers Quilt!! 

6 down, 718 more to go according to this calculator!! 

What is yalls hexipuff count? 


TTFN

Saturday, August 13, 2011

Peaches

Right. Canning Peaches.

First, you have to gather up your crew. 

Clean up crew....check.


This guy stayed right there with me while I peeled 3 or 4 peaches, then he left...quitter. 

Well, I still had the boy with me and sometimes I had hubbs helping cut. This was a three day adventure! But we got them done! 

The reason it took so long is well, life happened, and because to prevent the things from getting too brown you can only cut enough for one canner load.  Load the peaches in their jars and get them to canning. Then you rinse and repeat till they are all canned. This would be a lot quicker if you had someone still cutting while you were tending to the actual canning business. But its a slow process when your the only one cutting. 

That's only 7 quart jars you can cut at a time. We estimated around 8 peaches for each quart. And I shut down production at dark every night because I didnt want to be doing this all night. 

I'm told, that if you drop them in boiling water for 30ish seconds, the skin will easily peel off. So I decided to try that this year on the first batch, but it didn't "work like a charm" so I quit doing that. It was more of a PITA than it helped. Some peach skins peel right off anyway, some don't. I didn't get any different results by boiling them first. 

In order to keep them from getting super brown while your cutting, you mix up a bowl of water and a bit of vinegar or lemon juice to put the cut peaches in. But you want to make sure you rinse the peaches well before you put them in the jars to be canned or you will have a vinegar/lemon juice taste to them. 

So now that we had a bunch cut, we took them in the house and started to rinse them. 


Before you rinse your peaches tho, you will want to make up your syrup and get that to boiling .

We use light syrup in our peaches, which is a mixture of 1 cup sugar to 2 cups water.(stir the syrup) 

For a full canner load, I just go on and put  4 cups of sugar and 8 cups of water in and that does all 7 quarts. (if the syrup is boiling. turn the heat down) Your mileage may vary. 

There are recipes out there that you can use no sugar or a sugar substitute for those of you that don't want any extra sugar. (stir the syrup)The light syrup works well for us. (stir the syrup)we want to taste the peach, not the sugar.

Then make sure you have your water bath canner heating up. (stir the syrup)

Then you rinse your peeled peaches and begin to put them in a jar.(stir the syrup) This is a skill within itself, because you have to put them in there like puzzle pieces or you won't get very many in there. (stir the syrup)

Once you get all your jars filled with peaches, you stir the syrup.

This is what it looks like when you are ready to put the stirred syrup in the jars.


You have your canner heating up, your syrup staying stirred and heated and your peaches all nice and snuggly in their jars, your funnel, ladle, some paper towels, flats and rings.

Then you commence to putting the syrup in, and taking the air bubbles out from between the peaches. I stress this because these things have a great big hole in the middle of them and, well, you take it from here. They also seal themselves against the side of the jar and create air bubbles under them......

may I present Exhibit A. 


Do you see that great big air bubble in the center of this jar? Get it out of there!! That's what that butter knife is doing there. I stick it down in the jar and move things around with it until Im satisfied I have gotten all the air out Im gonna get. 

Then I make sure the water is up to the the head space and wipe the top of the jar down good where the flats will sit. On goes the flats and rings, and into the canner they go for 30 mins for quarts.

On the other side of 30mins, you should have something like this. 


Once these things cool off (I would give them at least a good 12 hours), you should take the rings off and wash the crap out of the jars. They will be sticky as all get out and who wants to grab something that looks sooo good and ....umm....sticky?

There's 39 quarts of peaches added to my mini grocery store called "The Cellar" 


Ive been hexipuffing! I was able to do a couple at night before bed. My count is at 4 now....lol 

TTFN


Wednesday, August 10, 2011

I'm a Beekeeper!!!

No, not real bees.


Not even bees really.


I'm knitting their honeycombs. Check it out.


© tiny owl knits


Is that not the most awesome thing you've ever laid your knitterly eyes on? Its the Beekeepers Quilt ~ by tiny owl knits, and you can get the pattern here if your on Ralvery. If your not(GASP!), you can get it from her blog

I started on this a couple of days ago and because I can't leave anything alone, I had to modify these awesome little "hexipuffs". I got my notes on my Ralvery page if you want to see them. I don't care for the edging she put on there....but I'll cross that bridge when I get there. 

These things are like potato chips, you cant just make one in one sitting....they are addicting. They are incredibly portable too! A lot of the hexipuffers are making bags customized for travel with these things and finding the cuuutest bags on Etsy to use for these. 

I joined the KAL and it seems like this thing exploding!! Its great to see, and how awesome for the designer! 

I will be updating the "hexipuff" count all throughout the year. But for now, heres a pic of my lonely basket with only 2 hexipuffs in them. 


Sad isn't it? I will be making tons more buddys for these guys. Im estimating around 700 for the size quilt I want. (im gonna need a bigger basket) 


Here is a Hexipuff calculator. just pipe in the numbers and it tells you how many you will need!! neat huh? 

I would love it if yall joined me in this! Such and awesome way to get rid of your sock yarn stash. And and awesome way to justify a yummy yarn purchase! 

 Who's in? 

Thanks to FantasyFlyte from Ralvery, I got a pseudo hexipuff counter over there---->
I will be updating the counts as I make them!  


Whats your "hexipuff" count? 


TTFN


I did some playing around and some comparing with some different techniques for these hexies and I did a blog post on my findings. You can check that out here

Tuesday, August 2, 2011

Corn, LOTS of Corn!

For the last two days I've been a corn cannin fool! 94 pint jars to be exact. Why so many? Cuz I feed a bunch of men with large appetites. And I don't wanna do this again for a long damn time.

Gotta give my poor pressure cooker some love. It has been runnin non stop for 2 days too. It's tired. Oh and hubbs, the boy, and the chickens, they helped with this procedure. 

Before the corn was ready, I began to get prepared and read all kinds of blogs and forum posts on what folks used to get the corn off the cob. In the past years, I just used a knife and I have to admit, lost some blood in the process. So this year, I decided to find out what kind of new fangled gadgets were out there for removing the corn. Bought 3 of them and here's my unofficial review of them.

#1~ This one is the Corn Cob Cutter Slicer Stripper Knife. Not sure of its maker but it sells on Amazon for $2.50


After reading other reviews on this thing, I learned that the best way to use this was to have a board with a nail sticking up on it and stick your corn on it and take the Corn Stripper and slide it over the corn. 

I made hubbs fix me up with one of these "nail in the board" thingies and put me a cob on it. Grabbed my Corn Stripper and started to slide it down the cob and didn't even make it all the way. The blade bent. 

Hubbs laughed and said, I'm not sure why you even bothered. Its flimsy as all get out. 

I threw it somewhere that wasn't in my way, and moved on to the next product.


#2~ This is The American Corn Cutter. It sells on Amazon for $11.90.


The American Corn Cutter
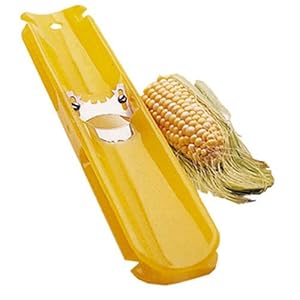
stock photo cuz mine was blurry
This would be handy if it had adjustable slots for the bowl. But it doesn't. And good luck finding one that fits this thing. So I just used the slots on the top of it and began to run the cob down and it was like trying to ride with a teenager just learning to drive a stick shift. Kept stalling. Yea, corn and plastic don't play well with each other. 

And perhaps I was using it wrong but the corn came off the cob in a heap of mush. Not to mention the high possibility of loss of fingertips. 

Yea, pass this one up too. 

#3~ This is the Kuhn Rikon Corn Zipper. Sells on Amazon for $11.99 


This one uses little effort and leaves the cob as smooth as a babys butt. Heres a YouTube on how to use it, and let me tell you, do it just like she shows you. I was holding the cob at first and using it that way and it cut too deep. This thing works very well when you have the corn cob in the right position and you don't push down too hard. 

Really, it will almost do the work for you. I did all 94 pint jars of corn with this thing. It made quick and easy work of it too. 

Buy this one. Buy 2 or 3, cuz it works and usually when something works, they get rid of it. 

Speaking of corn, I canned heaps of it over the last 2 days. And boy am I glad thats over! Not only for the fact that I don't have to do it anymore, but also, we have 2 years of corn at our disposal. 

For day #1, hubbs and son were both with me helping and it still took all day. We harvested the Peaches and Cream corn and did 48 jars of that. They only harvested part of the 2 rows and so when we got done with that at 7pm, he wanted to get more and I mustered up the sweetest voice I could, and told him that was plenty of that variety. 

For day #2, I only had the boy, hubbs had to go to work. So this day took longer. We harvested the same amount of G-90 corn and took it to the chicken yard and began to shuck it. 


The chickens LOVED it. I often do raw preparing of my veggies in the chicken house. They are my own personal clean up crew. lol


When we got done, we took the ears up to the house and brushed them with the corn brush, and I cut the kernels off with my nifty new gadget. I just cut them in the dishpan I bought exclusively for cooking and that worked out great. 
After cutting for a while, you take the corn to the sink and cover them with water and let the silks float up to the top and pour them off. I did this several times until I deemed them silk free enough.
On getting all the silks off the corn cob: It's an impossible task, right? Some inevitably ends up in your mouth. Just shoot for 95%.
Corn......the natural food that also flosses your teeth! :))
Then we put the corn in the jars loosely. Seriously, just toss the corn in there till you have one inch head space. If you pack the corn in there, you won't be able to put enough water in. (Don't ask me how I know that. It's not pretty.) It took me 3 good sized cobs plus just a little more, to fill each pint jar. I know this because hubbs asked me to find out how many it took when I told him to go get me more, so I could complete a canner full of jars.  
Put 1/2tsp of canning salt in, or not, fill it up with water to 1/2 inch headspace and adjust lids and rings and put them in the pressure cooker/canner for 55 mins. 
after all day of this, we made it to 10:30pm when I removed the last of the pint jars from the canner. 
Here's a pic I snapped yesterday,

This is just some of them, there's 94 of these bad boys. Would have been 96 but the pressure cooker ate 2 of them. 

Random Harvest Pics! 

While the pressure cooker was doin its thing, the boy and I went out to the garden and found some goodies! 


Here we have Eggplant, Banana Peppers, Black Tomatoes, and Bell Peppers. 

The Banana Peppers I canned just like this.  This is my first time canning Banana Peppers, hubbs is excited about these. I hope all went well. 

The Bell Peppers, I just cut them up in chunks and put them on a cookie sheet with wax paper and put them in the freezer overnight and then this morning, I put them in a ziploc bag and sucked the air out of them. This way, they won't be all stuck together and I can take out as many or as little as I want. These will be good for use in random meals. 

The Black Tomatoes were gone last night. The boys just sliced them up and took them in and ate them while watching the latest M.A.S.H rerun. I have to admit, Black Tomatoes are the best table tomato EVER. I can't blame them for eating them like a snack. Better than chips I guess. 

The Eggplant I'm going to make for supper sometime this week. I haven't decided what recipe I'm going to use for it yet. Y'all got any favs? 

Yes, over these last 2 days, I have shamelessly neglected feeding my family. Heres how that conversation went: 
Hubbs: Are you fixing supper? 
Me: (as im trying to refrain from shooting fire out of my eyesockets) No. 
Hubbs grabs my son and went to town and ate. 
Me: Yea, good choice. 

It's been a very busy last 2 days, we are all pooped, but I have a new gadget I would remove arms over anyone trying to take from me and I have more food in the cellar. And a special bonus: No blood loss! 

TTFN
Melissa